Sunday, April 22, 2012

Ladies 1912 Skirt part 2


The skirt went together very nicely. The instructions for joining the scalloped side to the front didn’t make sense to me, so I just did what made sense to me. First I rolled a narrow hem on the edge of the skirt front, on the right side of the fabric. Then I tried on the skirt, and marked how far it needed to overlap. For me, the edge of the skirt front came right to the edge of the facing on the scalloped side. I blind-stitched the layers together below the mark on the pattern. I put a hook and eye at the top of the skirt, and a snap at the tip of each of the top three scallop point. When I sewed on the decorative buttons, I sewed them through all of the layers, but I found that the points still flopped a bit, so I tacked each one down at the tip. It’s been a fun project, and I’m looking forward to my next VPLL 1912 project!

Pattern Review Checklist:

  1. Pattern Description: 1912 Ladies Skirt
  2. Pattern Sizing: 34” waist
  3. Did it look like the photo/drawing on the pattern envelope once you were done sewing it? Yes.
  4. Were the instructions easy to follow? Most of the instructions made sense.
  5. What did you particularly like or dislike about the pattern? I liked the way it used binding on the pointed scallops to add detail.
  6. Fabric Used: Cotton Twill
  7. Pattern alterations or any design changes you made: I took it in slightly to fit me.
  8. Would you recommend this pattern to others? Yes.
  9. Conclusion: It was a fun pattern to make, and turned out very nicely.

VPLL Checklist

  1. Pattern Name: Ladies Skirt #0200
  2. Sewer’s Skill Level: Intermediate
  3. Pattern Rating: 1-Not a Fan, 2 – So-So, 3 – Good/Average, 4-Better than Average, 5-I LOVED IT! and why? It turned out very nice for the amount of work it required.
  4. What skill level would someone need to sew this pattern and why? Intermediate, to be able to do the binding correctly. I wasn’t able to get it as nice as I would have liked.
  5. Were the instructions easy to follow? If not, what needs to be changed? Most of the instructions were easy to follow. The only step that confused me was joining the scalloped side to the front.
  6. How was the fit/sizing? Did it correspond to what you thought? Yes, it turned out how I thought it would.
  7. Did you make any pattern alterations? If so, what alterations did you make? Where they fit or design alterations? I made slight fit alterations.
  8. Other notes: It might be nice for the pattern instructions to include tips on correctly turning all the corners on the bias binding.

Friday, April 13, 2012

Ladies 1912 Skirt


My next project for the VPLL 1912 project is the Ladies Skirt, pattern # 0200. Since I used up my brown linen on my last project, I opted for a nice taupe cotton, brass colored buttons, and red trim for a splash of color. I adjusted the pattern to my size by pinching in a bit at the top of each pattern piece, but leaving the full width at the bottom, since I like full skirts. More to come.....

The Reproduction of a Vintage Dress, Part 2


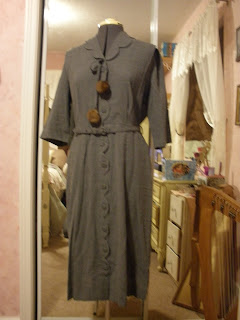
The fabric I chose was a lovely brown linen that I had recently added to my stash with another project in mind. Since the linen seemed perfect for this project, I decided to use something else for my other project. I knew I should make a muslin to test my pattern, but I was feeling pretty confident, and I was a bit impatient to get going on my dress, so I just dove in, and cut my fabric. As I sewed the dress, I discovered a few adjustments that needed to be made to the pattern, but thankfully, nothing serious enough to ruin my first attempt! I’d never done scallops before, and the turned out a little rough…I’ll have to work on that. I think the buttons camouflaged the imperfections a bit. The original grey dress had fur pom-poms on the bow, and my brother informed me that they were mink. I called several local taxidermists to see if I could get some mink scraps, but to no avail. I ended up settling for muskrat, otherwise known as “poor man’s mink”. The self-covered belt was a bit of a challenge – I couldn’t find a kit, so I had to make it up on my own, but I think it turned out nice. All in all, I think my pattern-making project has been a success! The finished dress looks very vintage – in fact, I’m tempted to show it to a friend of mine, who’s an expert in vintage clothing, and see if he thinks it’s original!

Tuesday, April 10, 2012

The Reproduction of a Vintage Dress, Part 1


It started when someone asked me if I could do some minor repairs on some vintage dresses. I jumped on the chance, and immediately fell in love with the dresses. One in particular caught my attention. It was a grey wool dress with ¾ length sleeves, scallops down the front, and a cover button in each scallop. Before I returned the dresses to their owner, I photographed the dresses, sketched them, and took detailed measurements. Then, since the grey dress was my favorite, I decided to reproduce it, first. Based on the measurements I had, I was able to create pattern pieces. I did cheat a little on the sleeve, and copied the cap from a similar sleeve pattern. Next, I resized the pattern to my size. Interestingly, although the dress was several sizes too large for me, it was exactly the right length throughout the bodice. The last step in my pattern-making process was adding the seam allowances. Finally, I was ready to try out my pattern! Coming soon…the results!